This is a continuation of my Introduction to ASP.NET MVC series. As I outlined before this is in an effort to write the book and keep blogging, I decided to write/blog the last chapter, Chapter 2. I am doing this so I can receive feedback on this chapter as early as possible. Because this chapter, in my opinion, is probably the most critical of the book, it defines the context around ASP.NET MVC and how it differs from ASP.NET Web Forms, as well as giving a historical perspective of the MVC pattern.
In the next several posts we will cover the following parts of Chapter 2 from the book:
- The Model-View-Controller Pattern
- ASP.NET MVC vs. ASP.NET Web Forms
- Installing the Prerequisites
- Your First ASP.NET MVC Project
- The Model
- The View
- The Controller
 | ASP.NET MVC 1.0 Website Programming: Problem - Design - Solution This item has not yet been released. You may order it now and we will ship it to you when it arrives. |
Your First ASP.NET MVC Project
To create your first ASP.NET MVC Project, you only need the prerequisites listed in the previous section. To start, you first need to open Visual Web Developer 2008 or any version of Visual Studio 2008.
For the purpose of this section I will be using Visual Studio 2008 Team Development Edition. I have, however, verified that this process works on Visual Web Developer 2008 SP1, Visual Studio 2008 Professional, and Visual Studio 2008 Team Development Edition.
After Visual Studio is open we need to create a new project (File > New > Project), see Figure 2-16 for an example.
[caption id="attachment_448" align="alignnone" width="459" caption="Figure 2-16"]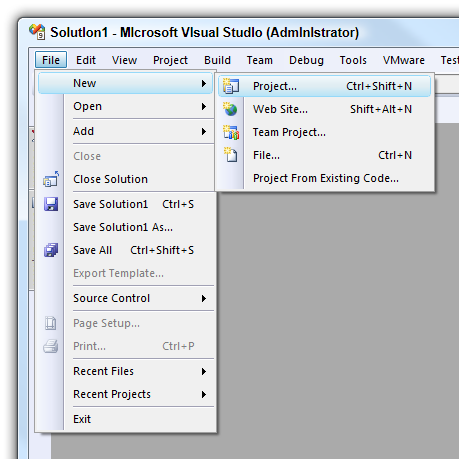 [/caption]
Doing this will put you in the New Project screen, which you will then select your preferred language (in our case Visual C#). From there we need to select Web @@> ASP.NET MVC Web Application, as depicted in Figure 2-17.
[caption id="attachment_449" align="alignnone" width="699" caption="Figure 2-17"]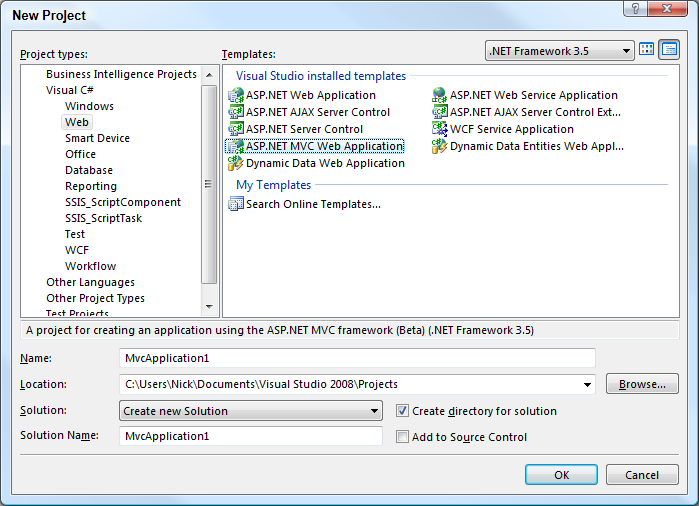 [/caption]
I am going to leave all the project configuration fields set to their default values as shown in Figure 2-17, you may configure them however you desire. When you are done click OK, and you will see the screen shown in Figure 2-18.
[caption id="attachment_450" align="alignnone" width="489" caption="Figure 2-18"]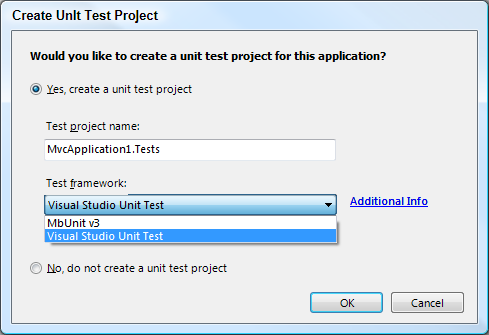 [/caption]
You have probably not seen a screen like this before, even if you have done ASP.NET Web Forms development. It is totally new to the ASP.NET MVC project creation process, and it automatically creates a unit testing project based on the default MVC project.
As an added feature it also allows you to select the testing framework that you would like to use, even non-Microsoft ones, such as NUnit, MbUnit, XUnit, Visual Studio Unit Test, and any others that decide to provide an interface to this Visual Studio process.
You can choose to create a unit project, or wait till a later time if desired. For the purpose of this demonstration I am going to create a unit test project using MbUnit v3 from the drop down. When you are done click OK, and you will see a Solution Explorer that looks like Figure 2-19.
[caption id="attachment_451" align="alignnone" width="276" caption="Figure 2-19"]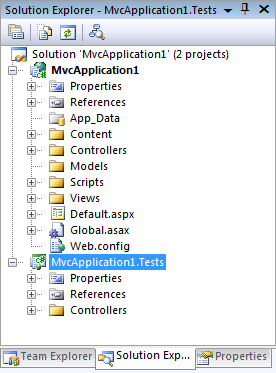 [/caption]
This is what the default folder and file structure looks like for the ASP.NET MVC project, it has a separate folder for Models, Views (as seen in Figure 2-21), and Controllers (as seen in Figure 2-20). As well as a set of default folders for storing JavaScript, CSS, or anything else you would want to deliver from your web application (as seen in Figure 2-22).
[caption id="attachment_452" align="alignnone" width="276" caption="Figure 2-20"]![]() [/caption]
[/caption]
There are two controllers created by default. The HomeController is used to render the home page and the about page. The AccountController is used to authenticate a user with the standard ASP.NET membership provider. These two controllers provide you everything you need to create a very basic web application.
[caption id="attachment_453" align="alignnone" width="276" caption="Figure 2-21"]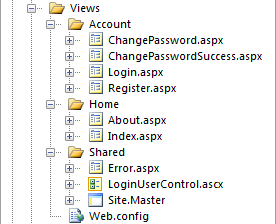 [/caption]
For the views there is a mirroring of the controllers created. One for Account and another for Home, in these folders there are aspx files that are call views. Each of these views mirror an action method from the controller, by default. As you will see later in this book there is a many to many relationship between the views and action methods. In that an action method can map to multiple views and a view can have multiple action methods that use it. Let's not get to in-depth about the mapping of views and action methods at this point, because we will cover this in great detail later in this chapter and future chapters when implementing our application.
There is also a shared folder called Shared, which is, for lack of a better word, shared between all of the controllers and can be called by any of the controllers in the project.
The last thing I want to talk about before we move on to the rest of the files in the solution, is what appears to be a rouge Web.config file located under the Views directory. This is a deliberate and strategic Web.config that is used, in addition to the one in the root, to block access to all the aspx files from getting accessed directly. This Web.config file contains the following configuration information:
<?xml version="1.0"?>
<configuration>
    <system.web>
        <httpHandlers>
            <remove verb="*" path="*.aspx"/>
            <add path="*.aspx" verb="*" type="System.Web.HttpNotFoundHandler"/>
        </httpHandlers>
    </system.web>

    <system.webServer>
        <validation validateIntegratedModeConfiguration="false"/>
        <handlers>
            <remove name="PageHandlerFactory-ISAPI-2.0"/>
            <remove name="PageHandlerFactory-ISAPI-1.1"/>
            <remove name="PageHandlerFactory-Integrated"/>
            <add name="BlockViewHandler" path="*.aspx" verb="*" preCondition="integratedMode" type="System.Web.HttpNotFoundHandler"/>
        </handlers>
    </system.webServer>
</configuration>
It contains both configuration information for IIS 7, <system.webServer />, and IIS 6 and lower, <system.web />. So you will be covered on which ever server you decide to deploy your MVC application to.
[caption id="attachment_454" align="alignnone" width="276" caption="Figure 2-22"]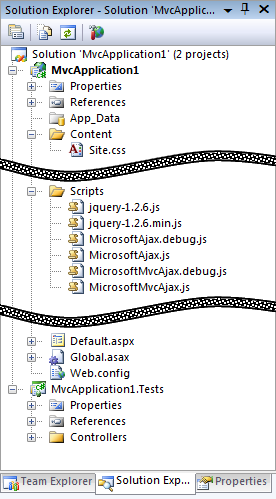 [/caption]
The rest of the solution files, includes JavaScript, Style Sheets, and other ASP.NET files that you should be familiar with. The JavaScript files that are included by default are Microsoft AJAX and jQuery, as well as debug version of the files.
In the Fall of 2008, Microsoft announced a partnership with jQuery (www.jquery.com) to provide support and deliver jQuery with Visual Studio 2010 and some key projects. One of the key projects that jQuery will be delivered with, is ASP.NET MVC.
If you are going to be using jQuery heavily in your application, as we are in this book, I highly recommend that you download the latest version of jQuery and the Visual Studio Intellisense Documentation for jQuery. jQuery is constantly being developed and new features are getting added all the time, so it really pays to be running the latest version, so be sure to get the latest production and development files:
There are some standard ASP.NET files that we have all seen before, but I would like to take this opportunity to give you a quick overview of the purpose of the Global.asax and Default.aspx files. These two files have a special purpose in an MVC application that you should be made aware of.
Global.asax
This is a standard ASP.NET file. MVC takes advantage of the file to initialize all the URL routes, for mapping actions and controllers to URL's, when the application is first started, using the Application_Start event handler.
public static void RegisterRoutes(RouteCollection routes)
{
    routes.IgnoreRoute("{resource}.axd/{*pathInfo}");

    routes.MapRoute(
        "Default",
        "{controller}/{action}/{id}",
        new { controller = "Home", action = "Index", id = "" }
    );
}

protected void Application_Start()
{
    RegisterRoutes(RouteTable.Routes);
}
Default.aspx
This is a standard ASP.NET file. It is not necessary on IIS 7, because of IIS 7's integrated pipeline. However you should not worry about it being present on and IIS 7 MVC application because, it will not interfere with the execution of the code. The sole purpose, of this file, is to handle root requests on IIS 6 and lower, it does this using the PageLoad event handler of the page and forcing the request through the MvcHttpHandler, instead of rendering the page, which is empty. The PageLoad event handler is shown in the code below.
public void Page_Load(object sender, System.EventArgs e)
{
    HttpContext.Current.RewritePath(Request.ApplicationPath);
    IHttpHandler httpHandler = new MvcHttpHandler();
    httpHandler.ProcessRequest(HttpContext.Current);
}
The final thing I want to cover is what the default ASP.NET MVC application design looks like when running in a browser, you can see an example of this in Figure 2-23.
[caption id="attachment_455" align="alignnone" width="792" caption="Figure 2-23"]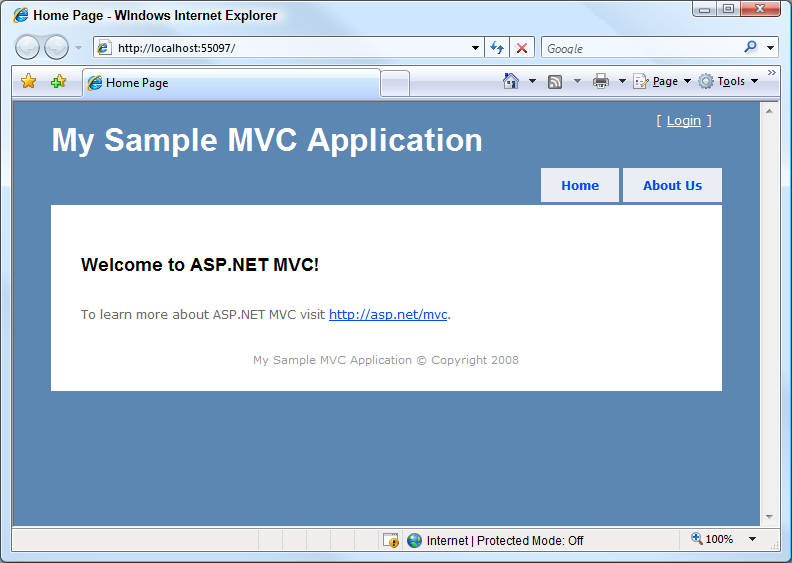 [/caption]
It is a pretty basic layout, but it is a good example of the Home and Account controllers and can be used to render to and interact with the browser.
In the rest of this chapter, we are going to cover the basics of the ASP.NET MVC Framework, with a specific focus on the Model, View, and Controller. So let's get started.
This post is licensed under a different license than the rest of my site. Copyright © Wiley Publishing Inc 2009