Note
I cannot endorse the SocketLabs service anymore. Everything below works with any SMTP service. If you would like great alternatives please give the people at:
On my server I run the typical assortment of applications that is on any true developers servers. I have PHP for my blog, ASP.NET MVC for my side projects, and a couple scheduled tasks that include backups and other things. All of these applications and tasks have different places to configure their default SMTP relay, and it was really getting out of hand, but I had gotten use to changing them all when the need arose, and usually I just defaulted them to the IIS localhost, because it was easy.
I knew the downfalls of using the default localhost and the potential mail delivery problems if I didn’t properly set the DomainKey, DKIM, SPF, SenderID, Reverse PTR, and blah blah blah. But it wasn’t really worth the hassle for me to properly set all this, because I can count the number of emails sent from my server on one hand each day. And a 4 out of 5 times they were administrative emails sent to my Gmail account. But given all that it is still no excuse for poor email hygiene.
Recently I learned about an unknown “feature”, at least to me, called smart host in the settings of the IIS localhost SMTP server. Which seems like it would solve all my problems, with very little effort, when I combined it with a Cloud Based High Deliverability SMTP Relay. This combination of the Cloud and a Smart Host would provide me the following:
- Keep all my applications pointing at the localhost SMTP built in to IIS
- Provide a higher deliverability
- Properly sign my emails with DKIM and SPF
- And setup a Reverse PTR for higher delivery to services that require it.
- And give me the wonderful benefit of analytics for my emails sent each day, analytics is like candy to developers, at least for me. Nothing better than a graph in my opinion
Getting Started
First things first you need to sign up for an SMTP Relay, I choose the Free SMTP Relay provided by SocketLabs Email On-Demand which is a High Deliverability Cloud-Based SMTP Relay to get the job done. Signup was easy, and they had my cloud SMTP server verified and provisioned in less than 24 hours.
Next make sure SMTP is installed on your local Windows box. I am not going to go through this part because it varies greatly between Windows 2003 and Windows 2008 R2. But if you really need help try this site.
Now lets setup the smart host using our SMTP Relay provided by SocketLabs. To set up a smart host:
- In IIS Manager, right-click the SMTP virtual server, and then click Properties.

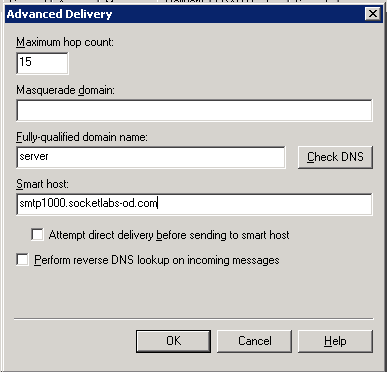
Click the Delivery tab, and click Advanced.
In the Smart host box, type the name of the smart host server. In this case it is “smtp1000.socketlabs-od.com” You can type a string to represent a name or enter an IP address.

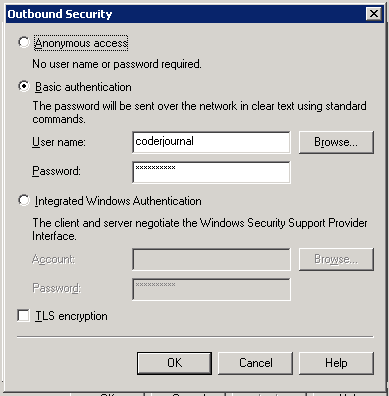
- Click OK and then click Outbound Security on the Delivery tab. And enter in your authentication credentials sent to you by SocketLabs.

- We are done
Using Your Smart Host
As I indicated before, this was an easy transition, because I didn’t have to change anything in my applications or tasks. They still all point to localhost, but now instead of localhost trying to deliver the mail, it just relays the SMTP request to my Free SocketLabs account.
For the geeks like me who like a little verification that all this is working as it should be, here is the email header from a comment email I received from this blog:
DKIM-Signature: v=1; a=rsa-sha1; d=socketlabs-od.com;[email protected];s=key2443;
    c=relaxed/relaxed; q=dns/txt; t=1285951803; x=1288543803;
    h=subject:to:date:from:message-id:mime-version:content-transfer-encoding:content-type;
    bh=NGN3BWusyQrG7TOAXx0uG/B+BoM=;
    b=sI9CfJrL7qM32wEtzfjxPIkZqsxeTRp7FLRZ1n5lLd1rVgDJzMlNyVhrE8BikBih7lxrKjm3HHZOFLVzQNeVmay4KuUyge/xv1wLxTnTmDUA5jbqt5Mh9vStc4cd4x6zz3zEJTqqLbzgtFN9C6LKiSUBpb3g4m/tqwk62OlBU94=
Received: from server ([69.59.171.172]) by mxsp2.email-od.com with ESMTP; Fri, 1 Oct 2010 12:50:02 -0400
Received: from server ([127.0.0.1]) by server with Microsoft SMTPSVC(7.5.7600.16385); Fri, 1 Oct 2010 09:49:00 -0700
Subject: [Nick Berardi's Coder Journal] Please moderate: "You're Invited To Code Camp 2010.2"
To: [email protected]
Date: Fri, 1 Oct 2010 16:49:00 +0000
Return-Path: [email protected]
From: WordPress <[email protected]>
As you can see on line 7 the message was sent to my local host server, and then on line 6 relayed to the SocketLabs Email On-Demand Server.
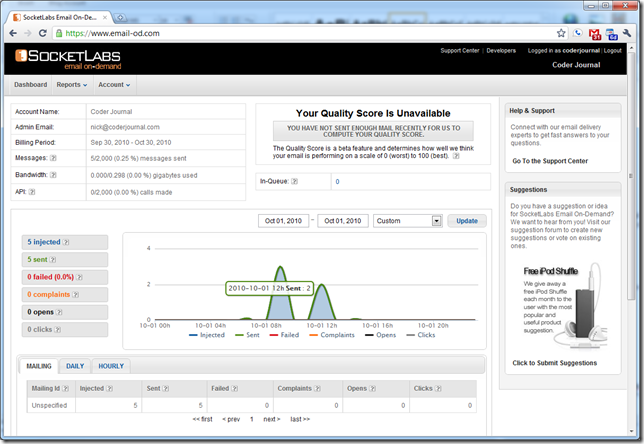
And here is my favorite part, the emails show up on the graph.
Note: If you have never setup a localhost SMTP server on Windows before. Make sure that you grant “127.0.0.1” or “localhost” the ability to relay mail through the localhost server. Sounds odd, but this is a necessary step in my experience. To do this click the Access tab, click the Relay button, click the Add button, and then enter the IP address “127.0.0.1” in to the IP Address text box, and click OK. Then just keep clicking OK to exit out of the properties screen.
Update (2010-10-25): If you find that your SMTP Relay is being blocked by your residential service provider or GoDaddy please read my updated post on how you can get around this using alternative outbound ports in the smart host.
